


 Designed by Louis Garami, this old timer model airplane was spotted in an article found in the July 1938 Flying Aces Magazine.
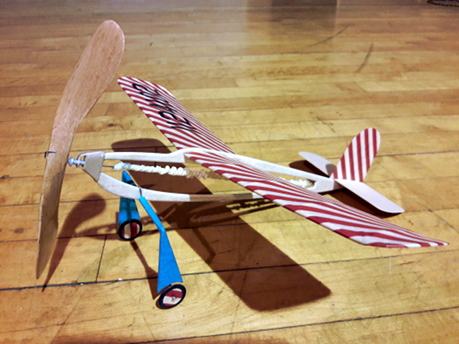
Jeff Nisley has created his own version of this “Sweetheart” as described in the article shown above right as a labor of love. Even though he has made some changes and adapted newer technologies and methods, he is first to admit that the overall design was solid in its day and has certainly stood the test of time.
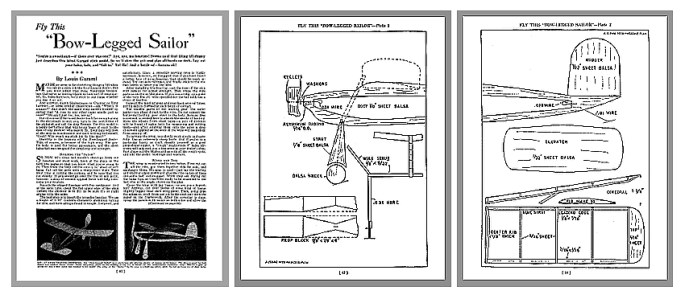 Click here to Download and Print the Original Article and Plan Drawings in PDF format of the Bow-Legged Sailer from the July 1938 Flying Aces Magazine.
 Straight off the building board on its maiden flight, Jack, named after the Cracker Jack duo Sailor Jack and Bingo, accomplished a 15 second 25 foot high rather impressive flight. “I was rather astonished at the success but also disappointed that my wooden prop had broken in two as result of the landing.”
By re-engineering some parts of the plane, some visible, some not so visible, I believe I was able to improve on the 1938 design concerning some of its short comings. For simplicity I will list them here:
1. The fuselage calls for 1/8″ Balsa. For extra strength without adding a lot of weight I decided to sandwich a piece of 1/64″ plywood between two sheets of 1/16″ balsa. This was glued with Duco cement and placed between two sheets of glass with a weight until it dried. I then cut out the fuselage shape. I”m glad I did as it’s exceptionally strong, perfectly flat, and doesn’t seem to be too heavy.
2. I took the liberty to lengthen the fuselage by 3/4″ giving it more distance between the stab and wing to hopefully aid in the stability.
3. I’m using a more modern metal bearing holder to hold the nose bearing. That took slicing the front end to allow for a space for the shaft to go through it. 1/64″ plywood was glued on each side and thread wrapped around it to finish it off. Now I can adjust the right and down thrust like you would with No-cal models.
4. For the wings, I placed 1/2″ triangular gussets in the four corners of each wing structure for added strength. I found that I was able to forgo the wing supports the original plans calls for by doing this. I’m a big believer in gussets placed where needed in key spots for strength on wings and other places on the airplane’s structure as well. In most cases the strength gained is well worth the weight penalty.
Other than that the build went rather smoothly. Some would say carving the wooden prop is the hardest part to make an old timer like this authentic. The instructions in the article in fact points this out:
“In carving the prop, you should work slowly and carefully. Use an extremely sharp knife.”
The paragraph ends by pointing out that if you “don’t classify yourself as a good prop-shaper-upper,
a ‘rough’ ready-made 6″ balsa airscrew will only cost you a few cents at your dealer’s shop.”
— Photo Gallery Featuring the Bow-Legged Sailor —
 Click the first photo to go to a Slide Show.
Use the Esc key on your keyboard or click in any black area to the side of any photo at any time in the slide show to exit back to this page.


