
——— Showcasing Model Aircraft Plans and Documents Useful to Aeromodelers ———

Plans & Documents List
Island Flyer Model Airplane
Authentic 1930s Lettering for Model Airplane Wings


The website Outerzone has hundreds of plans you can download for free. Outerzone’s gamut of plans range from a Gentle Lady all the way to a Super Sinbad. For those of you who are wondering what the name of the plane the plan is depicting above in the blue header above, the answer is an Armands Wakefield first appearing in a Nov 1942 Aeromodeller magazine.
If you are having trouble downloading PDF files, most likely installing a new version of Adobe Acrobat would remedy the problem. For a tip on having your downloaded file printed, see the Island Flyer Model Airplane segment on this page.

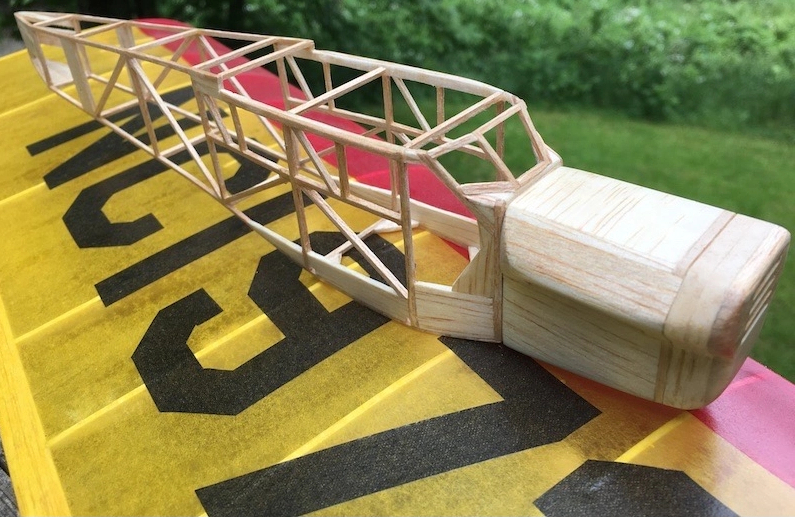
Island Flyer Model Airplane
Designed by Clive M. Wienker
A great plane for Novice Builders
In 2019, Jerry White enjoys a fabulous maiden flight
after little or no trimming of his newly completed Plane.
Jerry was the first to admit that he was new to the hobby.
With a little encouragement from HAFFA members and an excellent introductory novice model airplane plan provided by Jeff Renz—Jerry built his first outdoor model aircraft, the Island Flyer.
Everyone watching in the fall of 2019 at one of our Summer Flying Sessions was hopeful but not expecting a lot as Jerry prepared to launch his creation for the first time.
To everyone’s amazement Jerry’s Island Flyer took off, gained a considerable amount of altitude, circled perfectly, and came down in a gentle glide. All of this happened with an impressive flight time considering it had literally came off the building board straight to the flying field for its maiden flight.

Jerry White with his Island Flyer after its successful maiden flight
Given Jeff Renz’s prior experience with this plane (see the history of this plane at Gliders Group Forum) he was a little less amazed because he knew from prior experiences dating back to 1993 that the Island Flyer had a consistent history of being a relatively easy build, and that most if not all all of the planes built from this plan were successful flyers.

Tips for printing large drawings
Often drawings like the one above are much larger than a typical home printer can print at full scale. Here’s one solution:
 After downloading the PDF file, you can copy it to a Flash Drive Or memory stick. Some people also call them thumb drives. Surprisingly flash drives have become a lot less expensive than just a few years ago. I just bought a 64GB easystore thumb drive at Best Buy for under $10 (August 2020).
See this page: How to Copy Documents to a USB Flash Drive from Your Computer to get a copy of your plan file to the flash drive, then take it to a store providing print shop services like a UPS Store or Fedex to do the actual printing at full scale, which is what you want.
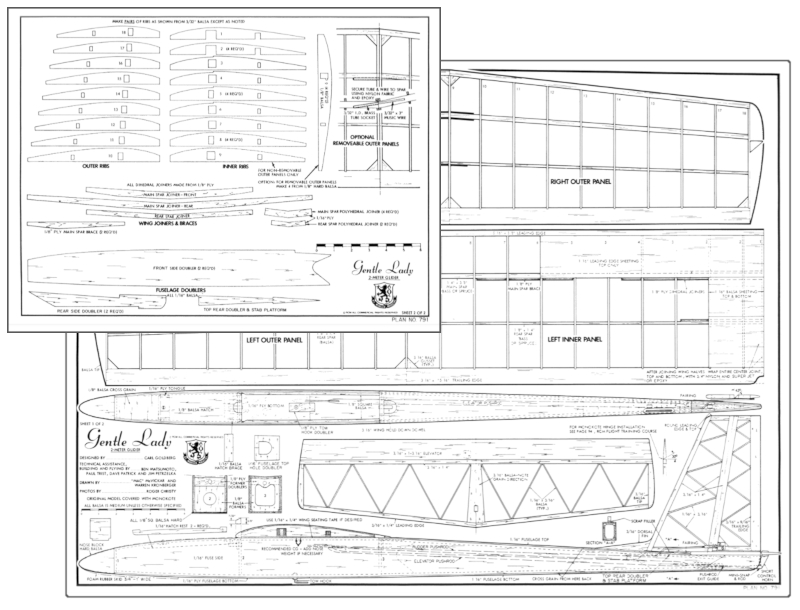
Download the Island Flyer Plan
by Clive M. Wienker
This plan drawing does an excellent job of explaining everything with clear instructions a novice builder would need to know in building his/her first built up fuselage model airplane. Often times plans will assume that the builder of the plane has prior knowledge and will omits details of the build, or not explain fully what to do. Not in this case.
The build uses ready available 1/16″ sheet balsa and 3/32″ balsa cross section for most of the longerons and cross pieces. Drawn in February of 1987, it has stood the test of time.
AUTHORS NOTE: If you are brand new to this hobby (which I was about 5 years ago), I would recommend you build your first plane from a kit, the main reason is that all the wood is all provided and with laser cut technology, all of the pieces of the plane are precut and ready to glue together. I recommend a Guillow’s Model Airplane Plane kit because of the very detailed instructions. The opening segment of this VIDEO does a good job of introducing you to it idea of making a Guillow’s kit. In this video Tim McKay talks about the Lancer Guillow’s kit. His “commercial” about the kit is only the first few minutes of this video, however the rest goes into an interesting subject of converting the kit to electric.
IMO the Island Flyer would be an excellent choice for your second plane as building this will add to your aeromodeling skills by building only from a plan and supplying and crafting all the components yourself.
Authentic Lettering for Model Airplanes
in use during the 1930s Golden Age of Aviation
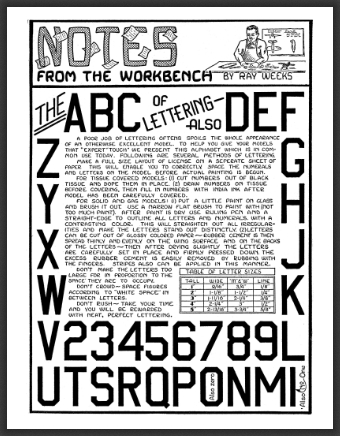
Submitted by Jeff Nisley — A Big thanks to Ray Weeks and his “Notes from the Workbench” from the August 1941 issue of Flying Aces
Here is away to a way to add authentic lettering to wings and other places on your model airplane.
This lettering font was popular in the very early days of WWI and often was required in the 1930s. It found popularity with the early mechanics of aircraft because it was so easy to produce on fabric wings because of its straight lines and 45 degree angles. Classic in nature—it has not lost its appeal, and readability.
On page 51 of the August 1941 issue of Flying Aces magazine, I came across the graphic you see to the right done by a very talented modeler/artist/draftsman of his day, Ray Weeks. I am still amazed and envious of his craftsmanship, drafting skill, and hand crafted lettering ability this piece of “artwork” possesses.
I love the way he instructs the reader on how to use his letters and his teaching abilities come through to modern day readers some 70 years later. It was the technology of the day and why it was such a necessity for model builders to subscribe to such magazines like the Flying Aces magazine during that era.
Download a copy of Ray’s “Notes from the Workbench” page here:
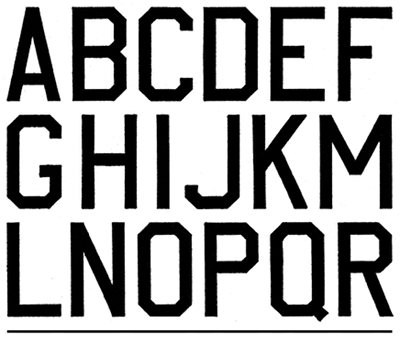
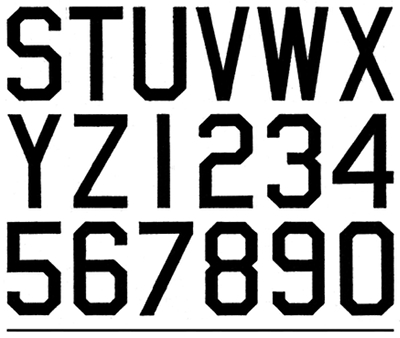
By using a program like Photoshop called GIMP I have produced an alphabet of numbers and letters in pdf form for aeromodelers to download and print that has reproduced Ray’s lettering and made it into a more usable form.
Download the Golden Age of Aviation Alphabet Font here. There are two pages to this PDF that are shown below.
All the letters and numbers as printed are a little over 2″ tall so if you need a different size for your purposes, you can use the reduce/enlarge feature of your printer to accomplish this. This PDF contains both the letters and the number shown below is available for download here:
At left is a shot of how Gene Dubois did the lettering on the wing of his Curtiss Robin.
It appears that Gene carefully cut out the letters in black tissue paper, maybe using a light table. Taking his idea you could apply the letters with your favorite adhesive.
Hopefully this will give you a starting place to use the Font alphabet I have provided.
If you have a favorite method I would like to hear from you. Just leave the tip in the LEAVE A REPLY box below.
Reprinted below are two paragraphs taken from an article that appeared in the December 2002 issue of Vintage Airplane magazine. The article was titled “Block Lettering — Exact proportions from the 1930s” and was written by H. G. Frautschy.

Block Lettering — Exact proportions from the 1930s
Download the compete 2 page article here in pdf format.
This article is a good place to start to obtain information regarding the regulations concerning markings for older aircraft during the Golden Age of Aviation.
Lettering Layout (Reprinted here from the Block Lettering Article)
Probably the easiest way to lay out block letters on a wing is to use a chalk line to mark the location for the top and bottom of the numbers. A yardstick may be used for the vertical lines. In most cases the vertical lines can be laid out parallel to the ribs. The letters are usually blocked in with pencil.
For outlining the smaller block numbers, such as those required on the tail group, much time will be saved if a lettering guide of the correct size and proportion is made. A lettering guide of this nature is shown in Fig. 1. Using this guide as a template, the outlines of any number and most letters can be quickly traced directly on the surface.
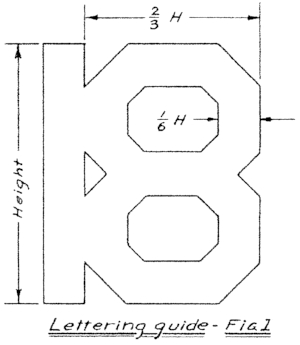
Lettering Guide – 8 1/2″ x 11″
Here you can download an 8 1/2″ by 11″ drawing that you can use to make your own lettering guide. Most copiers have a reduce/enlarge feature to allow you to get the size you require. I’ve included an elongated version of what you see above that closer resembles Ray’s Font and the font that Gene Dubois used on his 20 in Curtiss Robin Wing.
Lastly we have a parting shot of a Kenner Sportster built from a Flyline Model Kit by Hurst Bowers.
The block lettering and numbers that stand out on the right wing is a fine example of the “Golden Age of Aviation” look so crucial in adding realism and keeping your model totally authentic.

Use this CONTACT FORM to Submit a Plan or Document of your Choosing
If you would like to submit a plan of a model aircraft that’s not currently available anywhere on the Internet, or a document related to aeromodeling, leave your information in the CONTACT FORM below and we will get back to you with directions on how to get this done. Your information will not be shared. If you have a photo of a model made from the plan we encourage you to send it to us and will do our best to have that included as well in the article.


If you have any questions or just want to leave a comment, just use the LEAVE A REPLY box below and we will get back to you.
