Mike Basta’s 1995 “Souper P-30”

The first in the series of “HAFFA MEMBER of the Month” features a model aircraft that Mike Basta built for a Nationals P-30 Competition around 1993.

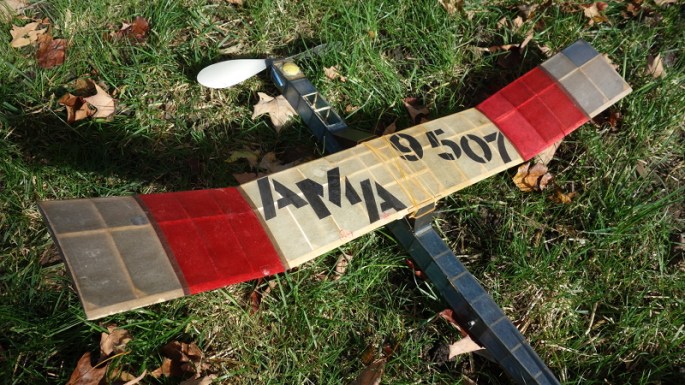
Before I begin, I would like to point out that the number 9507 shown on the wing of the “Souper P-30” above happens to be a relatively low number for an AMA number (Old timers will know what I mean). Mike Basta has been an AMA member a number of years and his craftsmanship and experience shows. At right is a 1993 photo of Mike actually flying the model aircraft featured in this article! Below left is a photo of him testing a motor of what looks to be the fuselage of a very nice aircraft. Lately he has concentrated his efforts mostly to rubber motor powered model aircraft.
 For local and national flying competitions, P-30 is a classification of rubber powered model aircraft that is attractive for beginners.
The following is a direct quote from Wikipedia:
“P-30 is a common beginner’s event. A P-30 must use an unmodified commercially available plastic propeller. P-30 has a maximum wingspan and overall length of 30 inches (76.2 cm), and uses maximum 10 g of rubber. The empty airframe must weigh at least 40 g.”
 The significance of this month’s model aircraft to this author is that I will try and build the exact model from scratch this winter.
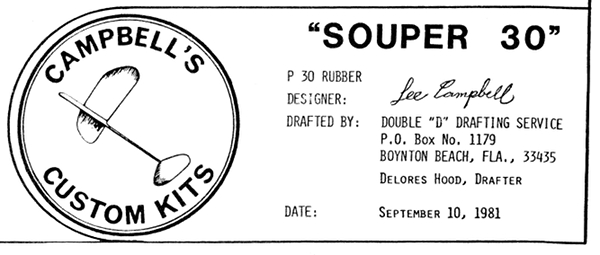
 The actual name of the model is “Souper 30” and the plane that Mike built back in that era, began life as a model kit he purchased in the late 1980s from Campbell’s Custom Kits that included all the necessary materials. Mike managed to save the drawing that came with the kit and that is all that I need—however I will have to come up with the rest of the materials this time around. The design of the model happens to be relatively easy because many of the balsa wood sticks and the wing’s ribs are the same size and profile.
The repetition of the model aircraft’s parts greatly reduces the complexity of the build—and gives a novice builder like me an advantage. Note also that the size of this model is easier to build than smaller models with finer detail, such as the Peanut class of model aircraft. Mike’s 1980s version is a good model to learn skills necessary to later tackle more complex model aircraft with curved wings and fuselages for example. I’ve also found there is a learning curve with almost everything I do that is associated with this hobby which for me keeps me wanting to keep plugging along…

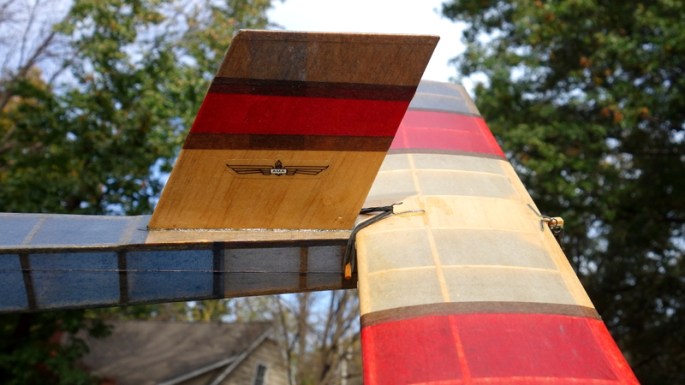
Above is the “Souper 30” model showing the simple fuselage construction and the consistent ribs of the wings. The open bays on the top of the front fuselage show where damage at one time occurred, so the tissue was removed and has yet to be replaced. It is not uncommon to see damage of this sort on vintage model aircraft (or even new ones for that matter). It is totally expected and comes with the territory. And yes, you will find instances of small damage and repairs made to this model if you study the photos close enough—which to this author, does not take anything away from the awesome existence of this time honored labor of love.
For those of us that are new to the hobby, the P-30 is sitting on a “stooge” which is a device primarily used to hold the plane steady while the owner uses a winder to wind turns on the rubber motor. (I will have a separate Project of the Month” this winter showing my stooge design and how I constructed it).
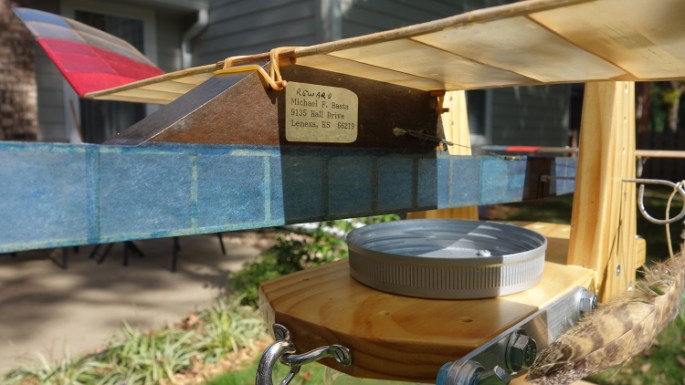
Shown above is the area of the left side of the fuselage and the connection of the wings with rubber bands. What’s nice is the translucent quality of the
sunlight coming through the wing of the tissue and stick construction of the wings. It seams to have a Japanese architecture quality about it relating to their time honored tradition of paper and wood panel wall construction. (This doesn’t happen with the now seemingly popular styrofoam construction of the majority of model planes sold at the local hobby shops).
Notice in the photo above a pin with a loop of wire that is inserted through the two “towers” of the stooge and goes though a hollow aluminum tube that’s in the fuselage of the plane. This hollow tube holds the back end of the rubber motor, inside the fuselage.

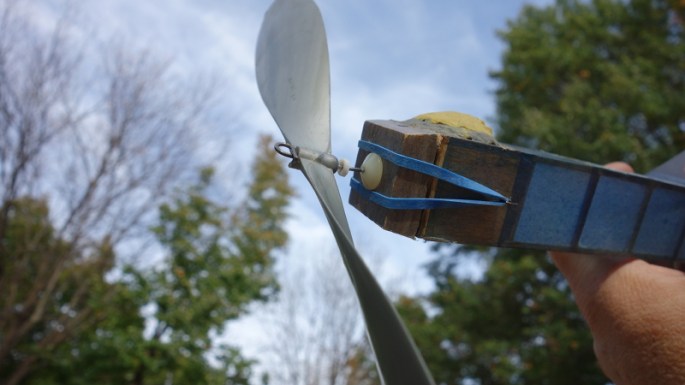
The above photo shows a closeup of this tube. When the pin of the stooge above is inserted, all of the twisting and pulling forces of winding the rubber motor is removed from the plane through the inserted wire pin and transferred to the wooden parts of the stooge thus saving the model aircraft.
On some large rubber powered model aircraft and especially during competitions, it is not uncommon to have upwards of up to 3000 or so winds on the strands of the rubber motor—so having a well made stooge is a necessary thing. The rubber motor can be as little as a loop of rubber strand tied into a loop, or could be dozens of strands of rubber, depending on the size of the model aircraft. The rules for competitions call for the number of ounces or pounds of rubber but does not specify the weight of each strand or the number of strands.The whole “experience” and the technology of winding rubber motors is a “science into itself” to the model aircraft enthusiasts and it is interesting to watch as there are many techniques and “tricks” to get the same thing gone. Add the many factors of wind velocity, direction, and other factors of weather, and it gets rather complicated fast. This is one reason the sport has stayed around since flight was invented.
Also notice above that there is a bay that is not covered with tissue on the underside of the fuselage. This allows access to the rear support for the rubber motor. The aluminum tube is pulled out the side, then the end of the rubber motor is placed around the tube inside the fuselage. The tube is then put back to where it was by pushing it back out the side. The small rubber band you see in the photo surrounding it keeps the tube in place during flight.
Next we will look at the front end. This view is on the left hand side of the fuselage. Notice the small mound of modeling clay just behind the tip. This “extra nose weight” was used to weigh the front end down slightly to move the center of gravity forward to better balance the aircraft. Also notice that there is a small shim where the nose piece meets the fuselage which has created a small gap on this side. This glued in piece of balsa wood is meant to point the propeller slightly to the right which causes the plane to bank in that direction. If done properly the effect will cause the plane to enter into an upward right hand spiral. Other modifications to the plane will cause the plane to spiral down after the rubber motor winds down. This whole process is called “Trimming the Model Aircraft” and is an important procedure to do if you want to have the plane return relatively close by in the same field. As time goes on it is harder and harder to find open fields large enough to safely handle free flight model aircraft.
Last of all we take a quick look at the rear stabilizer and rudder. As you can see, the stabilizer is held down by a hook and a small rubber band on the left side and a hook with a small cable made of upholstery thread on the right side. This is because this model has what is called a dethermalizer which allows the rear stabilizer to pop up after a set amount of time to limit the time the model is allowed to climb—and to force the aircraft safely back to earth.

If it was left to its own devices, there is a potential for the model aircraft to fly away—sometimes for miles as what happened to one of our member’s model aircraft this summer. The “Souper 30” has the traditional fuse activated type shown at right. The lit fuse burns the rubber band releasing the cable to allow the stab to pop up. There are other ways to do this, but this is a time honored way the 1981 model accomplished it so I will be making one for my plane. I will explore in greater detail how this dethermalizer works in an upcoming feature called “Tips and Techniques—how a fuse dethermalizer works and how to construct one”.
I hope you have enjoyed exploring this model of yesteryear and I hope to showcase other examples of fine craftsmanship like this one. A hardy thanks to Mike Basta for allowing me to use his model aircraft in this article.
 Below is a Slide Show featuring Mike. Click the first photo to go to a Slide Show. Use the Esc key on your keyboard to exit the Slide Show.


Jeff Nisley is the webmaster of the website Flyhaffa.com and would like to hear from you if you have any comments or suggestions at jeffnisley@ymail.com. Thanks.
If you liked this “HAFFA Member of the Month”, Here is a List of Other Member’s Web Pages:
Emily Guyett — Feb 2018 HAFFA MEMBER of the Month — Featuring Emily’s F1D Indoor Model Aircraft
Lynn Chaffee — Oct 2017 HAFFA MEMBER of the Month — Featuring Lynn’s Model Aircraft Collection
Jeff Renz — Feb 2017 HAFFA MEMBER of the Month — Featuring Jeff’s A6 Indoor Model Aircraft
Mike Basta — Nov 2016 HAFFA MEMBER of the Month — Featuring Mike’s 1995 “Souper P-30”
