Useful Tips, Templates and Advice for Administrators and Model Builders
for Help Setting up a Program like this for Your Model Airplane Club
 Movie Stars and Aviators Take Flight — Vanguard P-18 Mass Launch Program
Contains General Information for Club Members as well as the General Public.
Rules Governing the “Stars & Aviators Take Flight” Mass Launch Program”
To make it manageable, information for the Mass Launch Program
has been divided into three web pages with links to the other pages above.

How to Set Up Your Own “Stars & Aviators Take Flight” Mass Launch Program
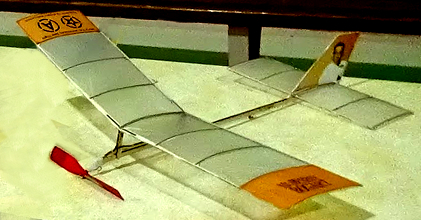
● Obtaining Photos of Movie Stars and Aviators for use on the Rudder
Photos of famous people are readily available on the Internet if you Google the name of the celebrity and select images from the menu.
 Google
For most of the photos used for the HAFFA Club’s P-18s, the author uses a photo editing software program similar to Adobe Photoshop called Gimp which is an open source program that the public is free to use. To get the photos to fit better on the rudders, some of them were modified and cleaned up a bit. This is totally optional and up to the model builder. If you have someone familiar with photo editing software and is willing to print the tissue for other modelers in your club, by all means have him or her do it. But OMO, as long as you can make out who the celeb is in the photo, to me it is perfectly fine.
Most of our Movie Stars and Aviators came from the Golden Age of Cinema and Aviation but more recent celebs are not ruled out. A more recent famous pilot comes to mine such as Chesley Sullenberger (Miricle on the Hudson).
One last item about the photos: Because you are using one photo for non-commercial purposes, copyright laws shouldn’t be a problem.
● Sizing the photo to fit the size and shape of the rudder
The shape of a P-18’s rudder is somewhat of an awkward target for a photo. Presented here is a way to remedy this so you can get a better idea of what the finished result will be. Click here for a PDF document that features a template for this purpose. it is used also to place register marks on the tissue that helps greatly when it is applied. (Look for this document in a few days—I’m working on it.) Directions on how the tissue for the rudder is printed is outlined below.
● Printing the name of the movie star or aviator for the left wing tip using an ink jet printer
 The word processing software i use is called OpenOffice (also is an open source software and free to the public to use) which is similar to Word for Windows. With this program I formatted a page to use for this purpose. You can access it he
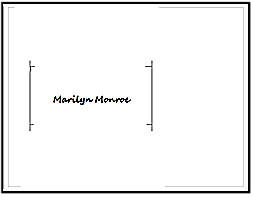 re or the thumb nail image to the right. If Marilyn’s wing tip text document opens in your program, you can use it as a starting place. Change the name to your star or aviator and then access Format > Character… from the drop down menus at the top to bring up a Font Effects Dialog Box. This allows you to change the font directly, change colors, and even add a drop shadow among other effects if you so desire. Cool!
This document is not a PDF, so it will allows you to go in and change the type. If this document will not load in your word processing software, try making a stab at it yourself using your word processor, and simply tape the tissue where it needs to be to get the job done. Experiment. It’s not as hard as it looks. You will get the idea of tissue printing if you print the logo outlined below.
● Printing the official logo the right wing tip using an ink jet printer
![]() Click here or the thumb nail image at the left for a PDF
Click here or the thumb nail image at the left for a PDF
document that features a template to print the Program’s “Stars & Aviators Logo” for the right wing tip. Follow the directions found on the page. This step is optional but will add a professional look to the planes of your fleet. This page serves as a “feeder page” that is put into the paper tray of your ink jet printer with all corners of the tissue Scotch taped over the area of the rectangular logo. By trying to match or coordinate the colors of your photo with the color you choose for the tissue, chances are the color scheme of your plane will come out fine, and make it unique. Once you get the hang of it, it’s a simple process well worth the effort.
Note: All of the templates that are available on this page have been sized for the Vanguard P-18 Kit available at Laser Cut Planes.
● Applying Grocery Bag Plastic & tissue to Balsa structures
Presented here is a link to a PDF document that that the author made that showcases his favorite method of applying both plastic and tissue to a fragile balsa wood structure such as a wing, stab or rudder using thinned down rubber cement.
Here is the link or you can click on the thumbnail image to the left. Ap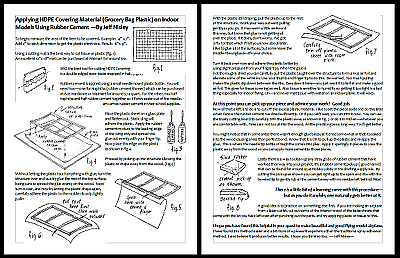 plying HDPE Covering Material on Indoor Models Using Rubber Cement
Note that you must not be tempted to use a glue stick or white glue to apply the HDPE covering material (grocery bag plastic). It will stick at first, but then after it dries, it will pull right off using little or no effort! I like top use rubber cement because you can use it with plastic and tissue alike with great results. Note that on the Vanguard it switches from plastic to tissue for the wing tips. (After the plastic, keep going with the rubber cement for the tissue.) Another great feature about this method is that you can clean up extra glue globs with a rubber cement pick up. It’s all in the document.
Some modelers prefer to use the method of spraying the framework using 3M Super 77 spray adhesive. The procedure for this is outlined in the directions for the Vanguard P-18. This method is fast and works for many model builders. I like my way because i have a tendency to get spray all over and to me the process is less frantic. A fellow modeler i know likes the spray method because it is fast and effective. It’s personal preference as to what you like to use.
Modelers Tip: Fellow HAFFA modeler Scott Baird told me to soak the tip of the 3M spray in a glass jar of acetone over night to un-clog the nozzle. Doing this will keep the spray can usable for years.
